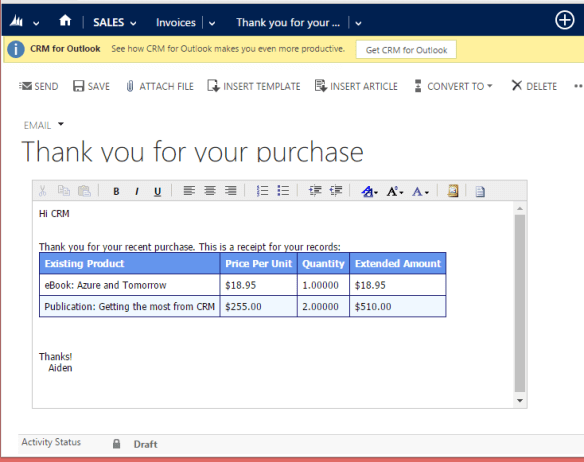
One of the coolest uses I’ve found for Workflow Essentials is to send a fully customizable itemized receipt, just by configuring a workflow in CRM. When an invoice is complete, I send an email with all the product details for the invoice. Here’s how you can do it.
Set up the basic workflow
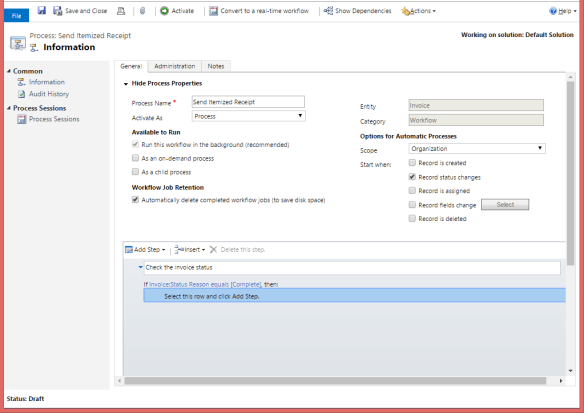
The workflow will run on the invoice record on status change, and the first step is to check the status of the invoice to ensure it’s Complete. I’d suggest letting it run On Demand for testing so you can use the same test invoice over and over again until you get it just right.
Set up a view for the products
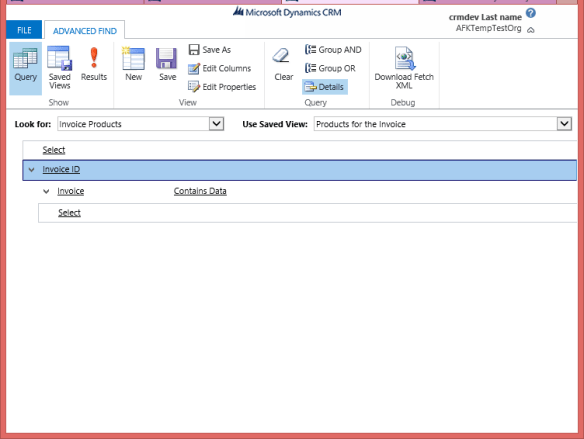
So now there’s a workflow that runs on the invoice and we want to include a table of invoice products. To include the records I need to create a View for them. To do that, do an Advanced Find for Invoice Products, then, since I’m only going to include invoice products for that invoice, create a link to Invoice (via Invoice ID), and add the condition Invoice Contains Data. This is a key for Workflow Essentials to tell it that you’re only including records where that invoice relationship is to that invoice. There are more details in this post. If you want to change the columns that will show in your table, click Edit Columns to add or remove them.
Save the view with an appropriate name (Products for the Invoice).
Call the activity – Query CRM for a Table
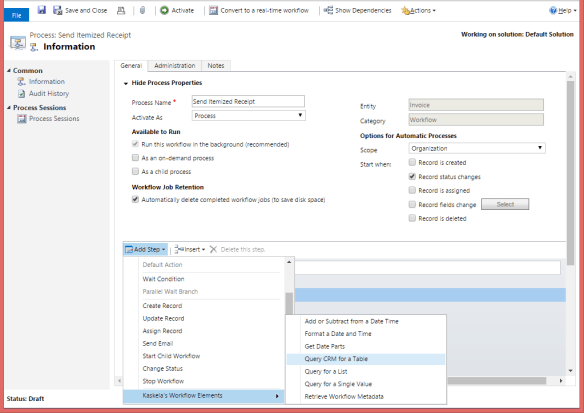
Back in the workflow, we want to add the custom step. Click inside the Check condition (so the action only runs if the invoice is complete), then click ‘Add Steps’, ‘Kaskela’s Workflow Elements’, then ‘Query CRM for a Table’ (“Query – Get a Table (Default Styles)” with v0.9.4). This will add the step to the activity.
Note: With version 0.9.1, this activity has been split up into two activities, one with the default styles and one with customizable styles.
Configuring the input parameters
Give the activity a descriptive name (‘Get the invoice details’), then click on Set Properties. This will bring up a window where you can configure all of the input parameters for this activity. For details on what each property is, check out this post. I like the default styles for the HTML so I’ll keep that the same. The important step here is to set the view we just created so the activity knows what you want to see. Since we created the view in the Advanced Find, it’s saved as a Personal View. Next to ‘pick a Personal View to Use’, click the lookup and select the view (Products for the Invoice). Save and Close the window.
Note: With version 0.9.1, the named option sets were replaced with hex code text input. I made the change due to a bug in CRM but I like it because you aren’t limited to just a list of colors.

Send the email with the table
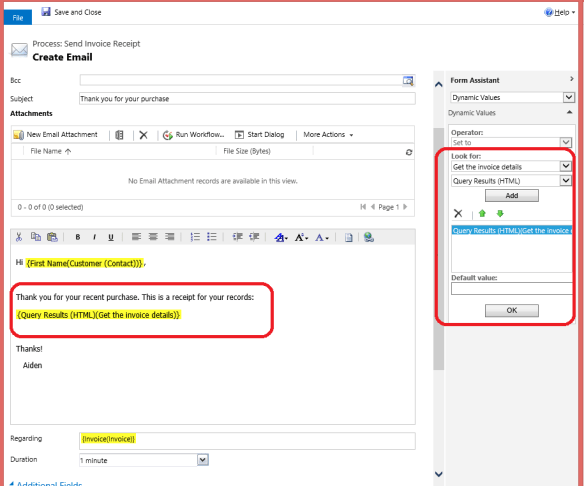
Now we have everything we need to send the email with the table in it. Add a new activity to send the email and configure the email content the same as if it were any other email. To include the table, click the spot in the content area where you want the table placed, then on the right side under ‘Look for:’ and select the name you gave the custom activity (mine was ‘Get the invoice details’). This fills the second drop down with all the output parameters from the workflow activity. Since we’re using an email, select ‘Query Results (HTML)’, click Add and then OK, and you should see the placeholder added to the email. Click on Save and Close.
Activate the workflow
Activate the workflow – that’s it! I suppose you could test it if you’re thorough… the most straightforward way is to create a new invoice, add a product and complete it. That should trigger your workflow and create the email. or if you enabled On Demand, find a completed workflow and test it on that one. Either way, you’ll end up with the same sweet result: