Power Automate Assistant: Reduce extra Power Automate runs and overcome trigger limitations

https://github.com/akaskela/PowerAutomateAssistant

Today I’m introducing a new open-source tool for the Dataverse called Power Automate Assistant. This will grow to include more features but I’m starting by addressing a big limitation in the Create / Update triggers in Power Automate.

Currently, if you have a flow configured to run on 10 fields and one of them changes, you don’t know which of the 10 triggered it. Not only that, but due to quirks in how fields are considered updated, it’s possible none of those fields actually changed but it still registers as an update (specifically, this can happen with SDK calls performing updates with extra fields and I’ve seen it a million times).

I built Power Automate Assistant to address these challenges, which not only tell you what fields changed but also cut down on the number of flow runs due to ghost updates. This tool is open source and available through the MIT license.

The Dataverse considers a field as having changed even if the value doesn’t actually change. We can’t control that. What we can do though, is create a new field and control when and how that is changed. By ensuring only true changes are tracked, we can bypass unnecessary flow triggers.

Here’s how it works:

In this example, we have a flow that runs when a Contact is created or updated, if the First Name or Email changes.

  1. Create a new text field on your entity (afk_ModifiedFields). In this case I’ll stick with 100 characters, but it should be as long as all the schema names for the fields you’re tracking.
  2. Install the Power Automate Assistant and configure it on the contact so it runs any time the First Name and Email changes.
  3. When those fields are updated, the tool will evaluate the field values to ensure it actually changed. If the fields have changed, it’ll update the new text field (afk_ModifiedFields) with the field names that changed.
  4. Configure your flow to run on afk_ModifiedFields.

What happens now?

With this setup, if you update the contact’s email address and save the record, your new text field will say “emailaddress1”. If the first name changed, it’ll say “firstname”. If both changed, it’ll say “emailaddress1,firstname”.

By setting your flow to run on that text field, we can ensure it only triggers if we have a real change, and on top of that, you can treat that new text field as an array and see what fields triggered the update and take actions accordingly.

Enjoy!

Where do I get it?

Managed and unmanaged solutions and source code is available at https://github.com/akaskela/PowerAutomateAssistant

Step-by-step instructions in the wiki on Github https://github.com/akaskela/PowerAutomateAssistant/wiki/TrueFieldChange

The real cause of a misleading Learning Path error

I recently configured Learning Path for a client and received an error every time I tried to write any content:

“The CRM Organization is not configured to open Learning Path authoring tool. Kindly get in touch with your system administrator.”

No matter what I did, every time I’d navigate to Settings -> Learning Path, I’d see the same error, taunting me:

learning path error

I went through the security settings a few times and verified the steps – Authoring was enabled, the users were in the right security group, etc. Everything looked good so I turned to Google, and of course Google hadn’t even heard of that one!

learning path google

Finally, I went back to the original Microsoft documentation and saw a prerequisite that was left out of the non-official blogs I had been referencing:

  • Have opted in for Learning Path. This setting is on by default, but can be turned off. 

To turn Learning Path on: On the nav bar, click the Options icon > Opt in for Learning Path.

Yes – I did this to myself. I previously opted out of seeing the Learning Path material when I use Dynamics 365 and as a result I couldn’t even open the Learning Path authoring tool. The most frustrating / biggest time suck of this is that Learning Path was pretty adamant I was missing a setting on the Organization that needed to be updated, instead of something I could update right on the same page. With this quick change made, I was able to begin authoring content.

I hope this helps you save time (or at least comes back in a Google search for somebody with the same problem). Enjoy!

How to recreate Filtered views in Dynamics 365 (code sample)

For all of us ‘CRM’ users who were used to writing SQL reports for CRM On Prem, one of the major features we’ve lost in moving to Online was the lack of SQL access. In December 2016, Microsoft gave us a fantastic tool to replicate the data to an Azure SQL Database (details on TechNet). With this tool you’re able to get the data from the cloud to a SQL database you have direct access to and everything is right in the world – except it’s really slow and it’s tough to write your SQL reports.

What’s the problem?

There are two key features included in the On Prem database that aren’t available when you replicate the data:

  1. Indexes aren’t automatically created so your queries are slow
  2. There are no Filtered views, so getting the display values for your report is a pain

Missing indexes are easy – when you’re writing queries that are underperforming, SQL will generate index suggestions. I used https://blog.sqlauthority.com/2011/01/03/sql-server-2008-missing-index-script-download/ and it got my contact query (1 million+ records) from 55 minutes to less than a second.

The big problem is that you don’t have Filtered views. In the On Prem, filtered views handled security for the user running the report, and it also provided extra columns to make reporting easier. Since Option Set fields are stored as an integer, you need to take extra steps if you want to display the label of the field.

What’s the solution?

I solved the display problem for one of my clients by writing code which mimics the Filtered views by generating views with extra columns for each of the labels. Here’s what you end up with:

  • The ‘contact’ table has a column ‘donotfax’ with value ‘0’
  • The ‘displaycontact’ view has a column ‘donotfax’ with value ‘0’, and ‘donotfax_display’ with value ‘Allow’.

Not only do these views give you all the original data with more details, but they’re just as fast querying the tables directly (at least, I can’t notice a difference). I spend a significant amount of time tailoring the views to get the best performance (it took me a while to track down a performance issue when you have too many join conditions).

How does the code work?

It’s pretty straightforward:

  1. Query the database to see what tables are there and match them up to entities in Dynamics 365 to determine the entities that need a view.
  2. Query for the existing views to see which ones need to be dropped and recreated.
  3. For each table that needs a view, find all the attributes that should have a display field (option set, Boolean, statecode, statuscode), and build up a column to get back the right value.

When do I need to run the code?

When you change the labels in Dynamics 365, the label is automatically updated in the database and your view will reflect the change immediately. The only time you need to regenerate the views is if you add new entities to the synchronization (requires a new view), or if you add new option set or Boolean fields to Dynamics 365 (the view needs a new column).

That’s it!

Now when you’re writing SQL against your replication database you’ll be able to query against the “displaycontact” and get back “donotfax_display” without having to write any other joins!

protected void GenerateViews(string sqlConnectionString, string crmConnectionString)
{
 // Adjust these to have different view or columns names
 string displayViewPrefix = "display";
 string displayViewSuffix = String.Empty;
 string displayFieldPrefix = String.Empty;
 string displayFieldSuffix = "_display";

 this.SqlConnectionString = sqlConnectionString;
 // Testing SQL connection
 string sqlError = this.ValidateSqlString();
 if (!String.IsNullOrEmpty(sqlError))
 {
   throw new ConfigurationErrorsException("Connection String error: " + sqlError);
 }


 CrmServiceClient service = new CrmServiceClient(crmConnectionString);

 // Retrieve existing tables from the replication database
 DataTable databaseTables = this.ExecuteQuery("SELECT [name] FROM sys.tables order by name");
 List existingTable = new List();
 for (int i = 0; i < databaseTables.Rows.Count; i++)
 {
   existingTable.Add(databaseTables.Rows[i][0].ToString());
 }

 // Retrieve the existing views
 DataTable databaseViews = this.ExecuteQuery($"SELECT [name] FROM sys.views where name like '{displayViewPrefix}%'");
 List views = new List();
 for (int i = 0; i < databaseViews.Rows.Count; i++)  {    views.Add(databaseViews.Rows[i][0].ToString());  }  // Retrieve the entities   RetrieveAllEntitiesRequest request = new RetrieveAllEntitiesRequest() { EntityFilters = EntityFilters.Entity | EntityFilters.Attributes };  RetrieveAllEntitiesResponse response = service.Execute(request) as RetrieveAllEntitiesResponse;  foreach (string tableName in existingTable)  {    // Ensure the table represents an entity and isn't an extra table in the database    EntityMetadata metadata = response.EntityMetadata.FirstOrDefault(e => e.SchemaName.Equals(tableName, StringComparison.CurrentCultureIgnoreCase));
   if (metadata == null)
   {
     continue;
   }

   // Drop the existing view
   string viewName = $"{displayViewPrefix}{tableName}{displayViewSuffix}";
   if (views.Contains(viewName))
   {
     this.ExecuteNonQuery($"DROP VIEW {viewName}");
   }

   // Build up the new view command
   StringBuilder sb = new StringBuilder($"select {tableName}.*");
   foreach (AttributeMetadata attribute in metadata.Attributes.OrderBy(a => a.SchemaName))
   {
     if (attribute.AttributeType == AttributeTypeCode.State)
     {
       sb.Append($", (select {attribute.SchemaName}_metadata.localizedlabel from ");
       sb.Append($"StateMetadata {attribute.SchemaName}_metadata with(nolock) ");
       sb.Append($"where {attribute.LogicalName} is not null and ");
       sb.Append($"{attribute.LogicalName} = {attribute.LogicalName}_metadata.[State] and ");
       sb.Append($"{attribute.LogicalName}_metadata.entityname = '{tableName}') as {displayFieldPrefix}{attribute.SchemaName}{displayFieldSuffix}");
     }
     else if (attribute.AttributeType == AttributeTypeCode.Status)
     {
       sb.Append($", (select {attribute.SchemaName}_metadata.localizedlabel from ");
       sb.Append($"StatusMetadata {attribute.SchemaName}_metadata with(nolock) ");
       sb.Append($"where {attribute.LogicalName} is not null and ");
       sb.Append($"{attribute.LogicalName} = {attribute.LogicalName}_metadata.[Status] and ");
       sb.Append($"{attribute.LogicalName}_metadata.entityname = '{tableName}') as {displayFieldPrefix}{attribute.SchemaName}{displayFieldSuffix}");
     }
     else if (attribute.AttributeType == AttributeTypeCode.Boolean ||
       (attribute.AttributeType == AttributeTypeCode.Picklist && ((Microsoft.Xrm.Sdk.Metadata.EnumAttributeMetadata)attribute).OptionSet.IsGlobal != null && !((Microsoft.Xrm.Sdk.Metadata.EnumAttributeMetadata)attribute).OptionSet.IsGlobal.Value))
     {
       sb.Append($", (select {attribute.SchemaName}_metadata.localizedlabel from ");
       sb.Append($"OptionSetMetadata {attribute.SchemaName}_metadata with(nolock) ");
       sb.Append($"where {attribute.SchemaName} is not null and ");
       sb.Append($"{attribute.SchemaName} = {attribute.SchemaName}_metadata.[Option] and ");
       sb.Append($"{attribute.SchemaName}_metadata.entityname = '{tableName}' and ");
       sb.Append($"{attribute.SchemaName}_metadata.optionsetname = '{attribute.SchemaName}') as {displayFieldPrefix}{attribute.SchemaName}{displayFieldSuffix}");
     }
     else if (attribute.AttributeType == AttributeTypeCode.Picklist && ((Microsoft.Xrm.Sdk.Metadata.EnumAttributeMetadata)attribute).OptionSet.IsGlobal != null &&
       ((Microsoft.Xrm.Sdk.Metadata.EnumAttributeMetadata)attribute).OptionSet.IsGlobal.Value)
     {
       sb.Append($", (select {attribute.SchemaName}_metadata.localizedlabel from ");
       sb.Append($"GlobalOptionSetMetadata {attribute.SchemaName}_metadata with(nolock) ");
       sb.Append($"where {attribute.SchemaName} is not null and ");
       sb.Append($"{attribute.SchemaName} = {attribute.SchemaName}_metadata.[Option] and ");
       sb.Append($"{attribute.SchemaName}_metadata.optionsetname = '{attribute.SchemaName}') as {displayFieldPrefix}{attribute.SchemaName}{displayFieldSuffix}");
     }
   }
   sb.Append($" from {tableName}");
   this.ExecuteNonQuery($"CREATE VIEW[{viewName}] as {sb.ToString()}");
 }
}
protected string ValidateSqlString()
{
  string errorMessage = String.Empty;
  if (String.IsNullOrEmpty(this.SqlConnectionString))
  {
    errorMessage = "Connection String is empty";
  }
  else
 {
   try
   {
     using (SqlConnection connection = new SqlConnection(this.SqlConnectionString))
     {
       try
       {
         connection.Open();
       }
       catch (Exception ex)
       {
         errorMessage = "Error establishing connection to SQL server: " + ex.Message;
       }
     }
   }
   catch (Exception ex)
   {
     errorMessage = "Configuration error in sql connection string: " + ex.Message;
   }
 }
 return errorMessage;
}

protected DataTable ExecuteQuery(string queryString)
{
  DataTable table = new DataTable();
  using (SqlConnection connection = new SqlConnection(this.SqlConnectionString))
  {
    SqlCommand command = new SqlCommand(queryString, connection) { CommandTimeout = 1200 };
    connection.Open();
    try
    {
      SqlDataReader dr = command.ExecuteReader(CommandBehavior.CloseConnection);
      table.Load(dr);
    }
    finally
    {
      connection.Close();
    }
  }
  return table;
}

protected bool ExecuteNonQuery(string queryString)
{
  bool successful = false;
  using (SqlConnection connection = new SqlConnection(this.SqlConnectionString))
  {
   SqlCommand command = new SqlCommand(queryString, connection) { CommandTimeout = 1200 };
   connection.Open();
   try
   {
     command.ExecuteNonQuery();
     successful = true;
   }
   finally
   {
     // Always call Close when done reading.
     connection.Close();
   }
 }
 return successful;
}


0.9.x won’t upgrade to 1.x

I previously wrote about the changes that would be coming with the overhaul from 0.9.6 to 1.0 but missed one big detail. Because I significantly overhauled the activities that were available, 0.9.x versions will not upgrade to 1.x. It sucks but I didn’t have any options if I wanted to introduce the new features.

If you want to upgrade from 0.9.x to 1.x, you’ll need to remove any steps that are calling into Workflow Elements, uninstall the old solution and import the newest version. Once you have that, you can recreate your activities and reactivate your workflows.

Big Changes coming to Workflow Elements

First, thank you to everybody who has downloaded Workflow Elements. Building this tool has been a real labor of love, and while I enjoy the work that goes into it, seeing people using it to help their organizations brings me a great deal of pride.

Second, I’m working on bringing Workflow Elements to App Source. This has been on my to do list for months but I’ve started my own business and this project had to take a back seat to some of those new responsibilities. Thankfully everything is running smooth now and I’m able to spend some time pushing this project forward again. The process of getting listed on App Source can be long but my goal is to get this listed by CRMUG Summit.

Third, I will regretfully be discontinuing Workflow Elements for older versions of CRM. I lost access to my old CRM environments and can’t justify the costs to buy hardware to support a free tool. I will continue to distribute Workflow Elements for CRM 2011/2013/2015 but will not be able to offer any updates to those versions.

These changes offer a great opportunity to quickly build new features. By only having to support the most recent version of Dynamics 365, I have the opportunity to leverage new messages only available in the CRM 2016 / 8.X SDK. This will let me quickly build new features that can take advantage of new functionality that Microsoft seems to be adding by the day. I’ll also have a higher level of confidence in the product by only having to test one version of the code (instead of 3 or 4 as I’ve had to in the past).

Thank you for your using Workflow Elements, and as always, tell me how I can make it easier for you.

Aiden Kaskela

Troubleshooting Tools for Dynamics CRM: DevTools

Note: I originally posted this at cobalt.net

At CRMUG Summit I sat in on a session with other developers discussing their favorite troubleshooting tools. They were all really cool, but I found one particularly useful since then and wanted to share my experiences with it. CRM DevTools from Sonoma Partners is a Chrome extension which quickly provides CRM record and environment information and makes troubleshooting and testing so much easier for me. In this post I’m going to share how I use this tool to be more effective in my role as a developer working with CRM.

Getting Started

The Microsoft Dynamics CRM DevTools extension is available from the Chrome web store and installs in seconds. Once it’s installed, you can access the features by going to the Chrome DevTools (F12 key) and clicking the CRM DevTools tab.

devtools_1.png

Quicker Access to Information with Forms Tab

If you’re looking at the DevTools from a record then the first tab you see has lots of helpful information for that particular record. Back when we were using Microsoft Dynamics CRM 4 you could get the entity ID and type code from the URL, but with 2013 and beyond, Microsoft has made that information a lot harder to get at. This section shows you the schema name of the entity, the ID of the particular record, the object/entity type code, and the type of form you’re currently looking at. When I’m trying to troubleshoot code that’s failing with a particular record, getting quick access to the ID is invaluable.

devtools_2.png

The action buttons on this form are really great to:

– Show Schema Name and Show Labels are a way to toggle the labels on fields, so you don’t have to open the form customizations to see what field is in the schema.

– Enable Form sets and disabled fields to Enabled so you can manually correct data that may have been set wrong through some process.

– Show Hidden Fields does what its name implies. This is really helpful when I troubleshoot JavaScript that references hidden fields and I want to see what’s happening with them. Of course you can set them to visible through the customizations, but now there’s no need to go through all those extra steps.

Enhanced options in Find Tab

The Find tab has options to make it easier to find certain records or other information not related to the record you’re on.

devtools_3.png

Some of the options available here are:

– Open Advanced Find: This is awesome to have with Microsoft Dynamics CRM 2013, when the advanced find could be painful to find.

– Open Record: if you have a record ID then you just have to select the entity name from the drop down, give the ID, and the record opens for you. I don’t use it that much, but I could see it being helpful in some circumstances.

– Find Type Code: A simple way to get the object type code given the name of an entity. I would prefer if it was a drop down of existing entities like the line above it, but it still gets the job done.

– Find Attribute: This drop down has a list of all the fields on the form and sets your focus on the one you pick. This could be helpful if you have a very large form, but I tend to use the built in Find through the browser.

Fetch – An Awesome Execution Area

Hands-down my favorite part of the Microsoft Dynamics CRM DevTools, you can write and execute FetchXML from your browser hitting CRM. It even has full Intellisense support for the valid schema! The FetchXML execution area is just awesome.

devtools_4.png

The Fetch area is prefilled with a valid fetch statement to retrieve 25 accounts and you can edit that query to build up really complicated statements. As a developer who uses Visual Studio all day, I love having suggestions provided for what keyword to use next. It doesn’t eliminate the need for a reference (not for me, at least), but it makes writing Fetch a whole lot faster.

The second part of this area that I love is the results section. As you’re writing a query you can hit the “Fetch” button below the text area and it executes your query and shows the result set in json format. This is so useful for me while I write Fetch because it gives you a chance to test your query as you build it and verify all your links and filters are working correctly.

Drawbacks When Using DevTools

Since the DevTools was written as a Chrome extension, it’s only available for that browser. At CRMUG 2014, the developer from Sonoma was asked if this would be available for IE or other browsers and he said no (with valid reasons).

The big problem this causes me is when Chrome gets an update that makes it harder (or impossible) to use for some parts of Microsoft Dynamics CRM. When Chrome v37 came out last September, one of their changes made it so you can’t perform some CRM customizations. When this happened I started using IE more and I didn’t have this at my fingertips any more. This may not be a problem for you at all; it really depends on how you use CRM.


Customizing the Microsoft CRM Ribbon: Ribbon Workbench Solution

ribbon_workbench_main

Note: I originally posted this at cobalt.net

I’ve been customizing and developing for Microsoft CRM for 10 years now and the most frustrating experiences I’ve had are all related to customizing the ribbon. Microsoft expanded the functionality available through the ribbon, but you couldn’t leverage any of it without manually updating the customizations XML. When CRM 2011 was introduced I found myself spending entire afternoons poring over Microsoft references trying to figure out exactly which XML nodes and attributes I needed to add to make a simple button do what I needed it to. I knew there had to be a better way; and eventually I found it.

Scott Durow (of Develop1) has written a fantastic Solution for CRM 2011, CRM 2013 and CRM 2015 which really helps simplify the customization process. By using a slick drag and drop interface, the Ribbon Workbench Solution can easily help you tailor the CRM ribbon to fit your needs. In this post I’m going to run through a simple scenario of customizing the contact form to add a button which invokes a custom JavaScript function.

The Ribbon Workbench Solution is free and available for download from Develop1 at https://ribbonworkbench.uservoice.com.

Creating a Working Solution

The workbench works by opening an existing unmanaged solution, adding in your changes, and then re-importing and publishing the solution. If you don’t already have a solution with your customizations, the first step is to create a new working solution with everything required by your new ribbon button. In my example, I have the Contact entity, two icons for the new button (16×16 and 32×32) and a simple JavaScript resource with the method I’m going to call.

ribbon_1

Here’s the function in my JavaScript resource, which gets the primary attribute from the contact (the full name) and alerts to the page. It’s not the most practical example but it’s easy to illustrate the behavior.

function AlertPrimaryValue() {

 var primaryValue = Xrm.Page.data.entity.getPrimaryAttributeValue();

 alert(primaryValue);

}

Open Your Solution for Editing

Open the Ribbon Workbench by navigating to the Solutions section of the Settings menu, and clicking on the Ribbon Workbench button.

ribbon_2.png

When the Ribbon Workbench opens, the first thing you’ll see is a list of all the unmanaged solutions that can be modified. Pick the solution we created that has all the required resources and hit OK.
ribbon_3.png
Side Note: The other solution listed is Dynamics CRM Snapshot, a free utility we’ve developed at Cobalt to help you take backups, restore from a backup to a point in time, clone, or restore a deleted record in CRM.

The main steps to create a new button are to create the command you want to run, create the button to initiate the command, and publishing the changes.

Create a Command to Call the JavaScript

When you solution opens (numbered for the image below)

  1. Select the entity that you’re going to update
  2. Right click on Commands
  3. Click Add New

A new command will be added to the Commands section.

ribbon_4

To associate a specific action with that command:

  1. Select the command to update
  2. Give the Id field a distinct, descriptive name. In this example, cobalt.contact.JavaScriptExample
  3. Click on the magnifying glass next to actions to build the action

ribbon_5

A new pop-up will open showing you a list of all the actions you’ve created for this entity. Since we haven’t created any yet the list is blank and you’ll select Add. The next prompt is for which kind of action you want to perform, either call JavaScript or open a URL.

ribbon_6

Select JavaScript, then type in the function name and Library that you created earlier and hit OK.

ribbon_7

Create the Button to Call Your JavaScript

Now that we’re ready to add the button to the form, we just need to drag and drop a button on the ribbon and set a handful of properties.

ribbon_8.png

Click on the new button in the ribbon and set a few key properties.

  1. Command – Select the command that was just created
  2. Images – You can select the images based on the Web Resources that are included in the solution you selected when you opened the workbench
  3. Labels – These properties are for the text you see on the button. Each property is for something slightly different but in this example I’m going to make them all the same thing.

ribbon_9.png

After making all your changes you should see your button updated with the new image and text. When you’re satisfied with your changes, hit Publish at the top of the screen. If everything goes well then you’ll be able to open a contact record and see and click on your new button:

ribbon_10.png

ribbon_11.png

Conclusion

The Microsoft Dynamics CRM team has given us a lot of flexibility to configure the ribbon but out of the box there isn’t an easy way to customize the ribbon to add buttons. The team at Develop1 has done a great job building a tool that greatly simplifies a complex process to the point where a non-technical user can now add functionality without having to reference the XML schema document. The Ribbon Workbench Solution has saved me countless hours, and I hope it will help you too.

Improving Performance of CRM Forms with IFrames

Note: I originally published this at cobalt.net

Microsoft Dynamics CRM has long supported Iframes on forms but the way they’re implemented usually has a negative impact on form load times. While I was researching the form load process in CRM, I came across a great topic on MSDN which describes how Iframes should be loaded for best performance. The article at ‘Write code for Microsoft Dynamics CRM forms’ (http://msdn.microsoft.com/en-us/library/gg328261.aspx) suggests using collapsed tabs to defer loading web resources, which means we can eliminate the load times for Iframes completely if you’re not going to use it. The idea is, instead of setting the Iframe URL in OnLoad you use the TabStateChange event, which fires when the Tab is expanded and collapsed.

To implement this we need to add a Javascript web resource for setting the URL, the form customizations with the tab and Iframe, and update the tab event to call the Javascript. In this scenario we’re going to set up an Iframe to show an Account’s website.

Setting up the Web Resource

Go to your default (or named) solution and add a new Web Resource of type Script (Jscript). The name of my script is cobalt_DeferredFormLoad. After saving the resource, click on the Text Editor button to enter your script.

improving-performance-of-crm-forms-with-iframes1.jpg

This is the script I’m using to set the URL. It’s quasi-generic, and will work for any entity where there is a website field on the form. The function takes in the name of the tab, the frame, and the attribute of the website.

function LoadIFrame(tabName, iframeName, websiteAttribute) {
if (tabName != null && iframeName != null && websiteAttribute!= null ) {
var isTabExpanded = (Xrm.Page.ui.tabs.get(tabName).getDisplayState() == “expanded”);
var websiteUrl = Xrm.Page.getAttribute(“websiteurl”).getValue();
if (isTabExpanded == true && websiteUrl) {
var IFrame = Xrm.Page.ui.controls.get(iframeName);
if (IFrame != null) {
IFrame.setSrc(websiteUrl);
}
}
}

}

Adding the Form Customizations

From the Account form, insert a new Tab and leave the default values. Click in the Section area of the new tab and insert a new Iframe from the Ribbon Bar. Give the frame an appropriate name (IFRAME_CompanyWebsite) and any default URL. I unchecked ‘Display label on the Form’ because the tab label looks good on its own.

improving-performance-of-crm-forms-with-iframes2.jpg

Now that the Iframe is setup you need to configure the Tab properties to load the Iframe. Under the Display tab, give an appropriate name and label, and uncheck ‘Expand this tab by default’.

improving-performance-of-crm-forms-with-iframes3.jpg

Configuring the Event

With the Tab properties open, go to the Events tab, Add your new web resource, then Add a new Event Handler

improving-performance-of-crm-forms-with-iframes4.jpg

In the Event Handler screen, fill in the name of the Function from the Javascript (LoadIFrame), and in the parameters section, list the parameters that need to be passed in the to function. The parameters are the name of the Tab, the name of the Iframe, and the name of the field that contains the URL to set. Remember that you’re specifying a string value and each parameter should be enclosed with a single quote mark.

improving-performance-of-crm-forms-with-iframes5.jpg

Once you save and publish the customizations you can verify the results on your entity. Open the account form and find your new Tab, expand it, and verify everything opens correctly.

Miscellaneous Notes

  • If your CRM instance uses SSL and the Iframe src doesn’t, then you may receive a warning from your browser (or no information at all). You will need to adjust your security settings.
  • You can easily update the Javascript function to not take any parameters and hardcode the tab, frame, and URL. I set it up this way so you could use it on other forms (contact, lead maybe) but it may not be needed in your case
  • If you use this same example, you can add a few other event to make the process a little cleaner. Since the website field is on the form, you know that if the website is blank then there’s no need to even show the Tab at all. I would add scripts to these events:
    • OnLoad of the form– If the website is empty then set the visibility on the tab to false
    • OnChange of the website field – If the website is set then show the Tab, if it’s cleared out then hide the Tab

Understanding the Microsoft Dynamics CRM Performance Center

Note: I originally posted this at cobalt.net

The Microsoft Dynamics CRM Performance Center is a fantastic addition to CRM which can help you troubleshoot performance issue related to loading forms in CRM. I’ve found a few online references about the CRM Performance Center but they all focus on how to access it and don’t really give you context for interpreting the results. This is my attempt to combine the diagnostics messages with other CRM materials (Microsoft Dynamics CRM 2013 Updated Form Performance, http://blogs.msdn.com/b/crm/archive/2013/10/31/microsoft-dynamics-crm-2013-updated-form-performance.aspx) in order to make the Performance Center more helpful for the CRM community.

Starting the Performance Center

The Performance Center is available in CRM Online and CRM OnPremise 2013 SP1 or higher. The performance center doesn’t seem to work in Chrome (the browser closes with the key combination), but IE 8+ works fine.

To enable the Performance Center:

  1. Open a form that you want to benchmark
  2. Hit Control+Shift+Q to open the Performance Center window
  3. Click ‘Enable’ to start logging, and then ‘Close’

performance center 1

  1. Refresh the form and open the performance center again
  2. Verify the benchmarks are now loaded
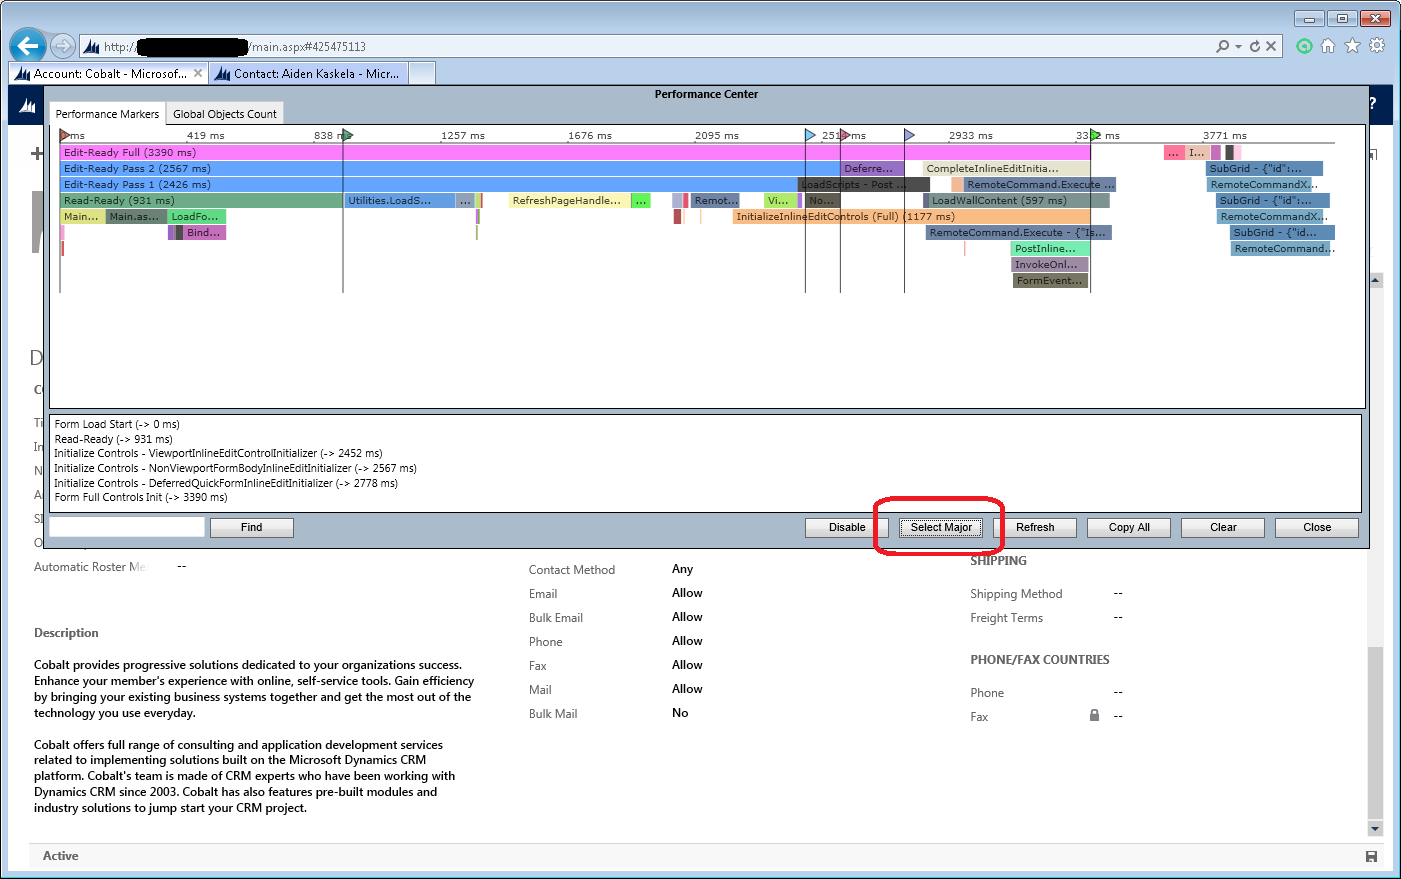
  3. Click ‘Select Major’ to get a summary of milestone.

performance center 2

  1. When you’re done with the Performance Center, make sure to click ‘Disable’ to stop the logging, so you aren’t adding additional overhead.

Diagnostic Messages and Associated Events

Diagnostics Message: Form Load Start (→ 0ms)

  1. The diagnostics timer starts and form initialization begins
  2. The form load bootup process starts, which requests entity instance data, configuration information, CSS, and Javascript tags from the CRM server.
  3. Entity metadata and the form retrieval – The layout is retrieved from the browser cache
  4. Data binding and building the read ready form – The form layout and record data from the previous two steps are built and displayed to the user. All of the fields and their data are visible but they aren’t editable yet. This state is called View Ready, or Read Ready.

Diagnostic Message: Read-Ready (→ 931 ms)

  1. Transitioning the form to edit ready – The form downloads any additional Javascript which has logic for any controls on the form. The Javascript is executed in order. Individual field controls are initialized.
  2. Social pane and Inline subgrids initialization – In this stage, data is pulled from related records for display in the Social pane or subgrids on the form.
    • Expanded grids in the current viewing area are loaded
      Diagnostic Message:  Initialize Controls – ViewportInlineEditControlInitializer (→ 2452 ms)
    • Expanded grids off the current viewing area are loaded
      Diagnostic Message:  Initialize Controls – NonViewportFormBodyInlineEditInitializer (→ 2567 ms)
    • Collapsed grids are loaded
      Diagnostic Message:  Initialize Controls – DeferredQuickFormInlineEditInitializer (→ 2778 ms)
    • Load the Social Wall
  3. The Form’s OnLoad event is executed

Diagnostic Message:  Form Full Controls Init (→ 3390 ms)

At this stage, the form is completely editable. Clearly there are a lot of moving parts when it comes to rending a single form in Dynamics CRM.

How to Improve Performance

The messages can be a bit misleading because a lot of the events are handled, at least partially, asynchronously. For instance, grids can begin to load in step 6.a, but there’s another event “CompleteInlineEditInitialization” that runs parallel with loading the social wall in 6.d. I think the general approach should be to minimize that critical path of code that must run synchronously.

Before getting into specifics improvements, one easy way to help load time is to simplify what’s available on the form. CRM can be such a powerful tool that sometimes we might get carried away and try to just show everything possible on each form, at the expense of performance and really, user experience. If you’re judicious about what you’re showing then every step could be quicker.

Between initialization and read-ready
The two primary actions here are retrieving the record from the database, and merging that with the HTML template for the form. The big gain you can get here is just from reducing the number of fields that need to be handled. If you have a plugin registered on the Retrieve event of the entity, that time would be logged here, so you may want to look at optimizing you plugin step as well.

Between read-ready and Initialize Controls – ViewportInlineEditControlInitializer
The two big actions here are downloading and running field Javascript and loading expanded grids in the current viewing area.

To reduce time associated with loading and executing Javascript, you can follow a number of best practices described in the article Write code for Microsoft Dynamics CRM forms, available at http://msdn.microsoft.com/en-us/library/gg328261.aspx . Best practices include:

  • Avoid including unnecessary JavaScript web resource libraries
  • Avoid loading all scripts in the Onload event
  • Use collapsed tabs to defer loading web resources

I can’t find any firm references online, but from talking with other CRM developers the consensus is that collapsed Subgrids load more asynchronously than expanded Subgrids. Since they’re collapsed, the form only has the header to render because they records aren’t needed until the grid is expanded.  Based on the diagnostics messages, it seems like the most intensive grids to load are:

  1. Expanded grids in the current view
  2. Expanded grid outside the current view
  3. Collapsed grids

If you’re seeing large times in this area, you may want to look at changing grids to be collapsed, or at least lower down the page. Either way, you should see a reduction in the critical path to loading a page.

Another approach here is to limit the columns that are displayed in the grids (not just the count, but the logical location of the records). If you’re on an Account record looking at the names of associated Contacts, you’re touching one table for the contact info. If the contact grid also includes address information, now you’re linking to both the contact and customeraddress table and your query will take longer to execute.

Between Initialize Controls – ViewportInlineEditControlInitializer and Initialize Controls – NonViewportFormBodyInlineEditInitializer
It seems like most of the time in this section is for loading expanded grids off the current viewing area. As I mentioned before, these can either be collapsed or removed completely to speed up load time.

Between Initialize Controls – NonViewportFormBodyInlineEditInitializer and Initialize Controls – DeferredQuickFormInlineEditInitializer
Since the times here are for initializing collapsed grids, there’s not much you can do to speed up this stage besides removing the Subgrids altogether.

Between Initialize Controls – DeferredQuickFormInlineEditInitializer and Form Full Controls Init
The form Social Wall is loaded and the forms OnLoad event is executed. If you’re seeing excessive slowness here you can try to limit what’s on the Wall or remove it altogether, or dig into your event code to look for inefficiencies in either the script logic or even what’s loaded (see Write code for Microsoft Dynamics CRM forms above).

Conclusion

Microsoft Dynamics CRM is an incredibly extensible and customizable tool, but with that freedom comes a potential for performance issues. By removing unnecessary form fields and optimizing Subgrids, we’re able to speed up performance and give a cleaner, crisper user experience. Although there will always be some minimum load time for forms, if we’re selective about what we present and how it’s presented, we can greatly enhance the user’s experience and increase overall satisfaction.

Changing the Execution Order of Business Rules in Microsoft Dynamics CRM

Note: I originally published this at cobalt.net

Business Rules are a great way to customize form behavior in Microsoft Dynamics CRM. This feature was introduced in CRM 2013 and is now available in CRM Online, CRM 2013 and CRM 2015. With a simple setup, Microsoft has provided a way to set field values, set field requirement levels, show or hide fields, enable or disable fields, validate data and show error messages, all without writing any JavaScript.

With so much functionality available you’re bound to have multiple rules for some entities and if you have inter-related Business Rules it may be important for you to run them in a specific order. Unfortunately Microsoft doesn’t provide a way to specify the order that the rules should be executed, but after some quick research, we found that they run in the order they were activated – oldest first (http://technet.microsoft.com/en-us/library/dn531086.aspx#BKMK_OrderOfLogic).

So, the trick is to deactivate all of the business rules for a specific entity and reactivate them in the order you want them to execute. This works well when you create the rules all at once, but it doesn’t allow you to see what the current order is after the fact. This becomes an issue when adding new rules or troubleshooting.

To work around this limitation, you can simply use Advanced Find (our longtime favorite CRM feature) to find the rules. You can infer the activation date from the Modified On date since you can’t make changes unless you deactivate the rule. Business rules are a type/category of process in CRM, so an advanced find of active process where the primary entity is the entity whose rules you’re reviewing will do the trick.

business_rule_find

Run the query to get back your business rules…

business_rule_find_results

… and get the results.

The other really cool feature is that you can deactivate and edit the business rules directly from the advanced find results! If you sort the view/results by the Modified On date, you can quickly view the execution order.