
Note: I originally posted this at cobalt.net
I’ve been customizing and developing for Microsoft CRM for 10 years now and the most frustrating experiences I’ve had are all related to customizing the ribbon. Microsoft expanded the functionality available through the ribbon, but you couldn’t leverage any of it without manually updating the customizations XML. When CRM 2011 was introduced I found myself spending entire afternoons poring over Microsoft references trying to figure out exactly which XML nodes and attributes I needed to add to make a simple button do what I needed it to. I knew there had to be a better way; and eventually I found it.
Scott Durow (of Develop1) has written a fantastic Solution for CRM 2011, CRM 2013 and CRM 2015 which really helps simplify the customization process. By using a slick drag and drop interface, the Ribbon Workbench Solution can easily help you tailor the CRM ribbon to fit your needs. In this post I’m going to run through a simple scenario of customizing the contact form to add a button which invokes a custom JavaScript function.
The Ribbon Workbench Solution is free and available for download from Develop1 at https://ribbonworkbench.uservoice.com.
Creating a Working Solution
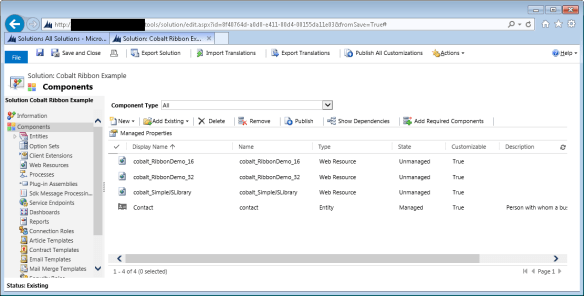
The workbench works by opening an existing unmanaged solution, adding in your changes, and then re-importing and publishing the solution. If you don’t already have a solution with your customizations, the first step is to create a new working solution with everything required by your new ribbon button. In my example, I have the Contact entity, two icons for the new button (16×16 and 32×32) and a simple JavaScript resource with the method I’m going to call.
Here’s the function in my JavaScript resource, which gets the primary attribute from the contact (the full name) and alerts to the page. It’s not the most practical example but it’s easy to illustrate the behavior.
function AlertPrimaryValue() {
var primaryValue = Xrm.Page.data.entity.getPrimaryAttributeValue();
alert(primaryValue);}
Open Your Solution for Editing
Open the Ribbon Workbench by navigating to the Solutions section of the Settings menu, and clicking on the Ribbon Workbench button.


The main steps to create a new button are to create the command you want to run, create the button to initiate the command, and publishing the changes.
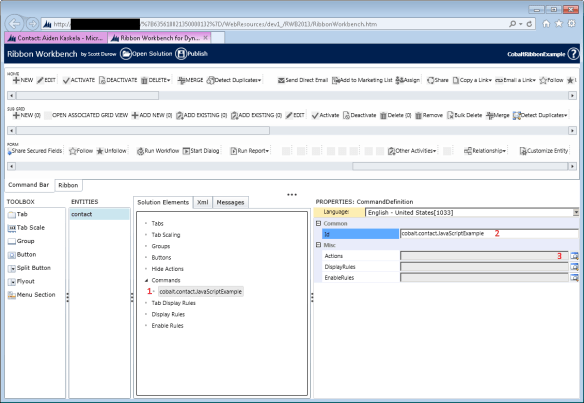
Create a Command to Call the JavaScript
When you solution opens (numbered for the image below)
- Select the entity that you’re going to update
- Right click on Commands
- Click Add New
A new command will be added to the Commands section.

To associate a specific action with that command:
- Select the command to update
- Give the Id field a distinct, descriptive name. In this example, cobalt.contact.JavaScriptExample
- Click on the magnifying glass next to actions to build the action
A new pop-up will open showing you a list of all the actions you’ve created for this entity. Since we haven’t created any yet the list is blank and you’ll select Add. The next prompt is for which kind of action you want to perform, either call JavaScript or open a URL.

Select JavaScript, then type in the function name and Library that you created earlier and hit OK.

Create the Button to Call Your JavaScript
Now that we’re ready to add the button to the form, we just need to drag and drop a button on the ribbon and set a handful of properties.
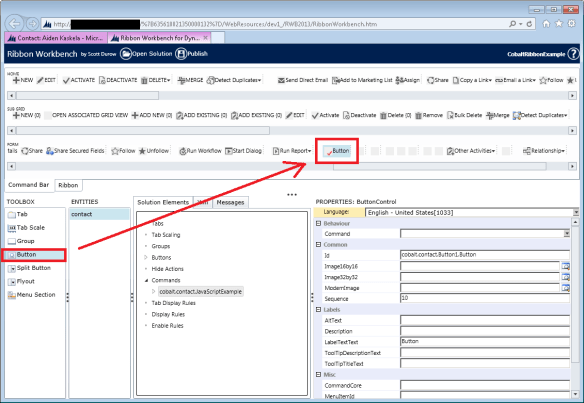
Click on the new button in the ribbon and set a few key properties.
- Command – Select the command that was just created
- Images – You can select the images based on the Web Resources that are included in the solution you selected when you opened the workbench
- Labels – These properties are for the text you see on the button. Each property is for something slightly different but in this example I’m going to make them all the same thing.

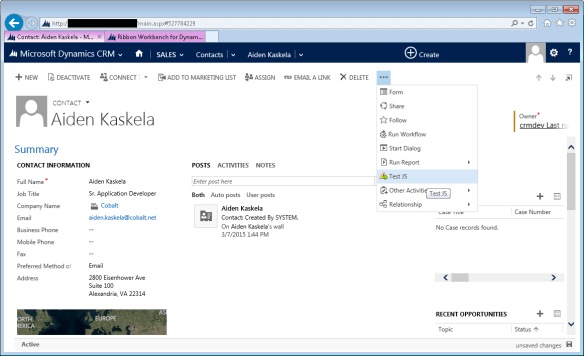
After making all your changes you should see your button updated with the new image and text. When you’re satisfied with your changes, hit Publish at the top of the screen. If everything goes well then you’ll be able to open a contact record and see and click on your new button:

Conclusion
The Microsoft Dynamics CRM team has given us a lot of flexibility to configure the ribbon but out of the box there isn’t an easy way to customize the ribbon to add buttons. The team at Develop1 has done a great job building a tool that greatly simplifies a complex process to the point where a non-technical user can now add functionality without having to reference the XML schema document. The Ribbon Workbench Solution has saved me countless hours, and I hope it will help you too.
